Tips & Tricks for Microsoft Office
Everyone has heard of Microsoft Office. Whether you are an avid writer or just create an occasional work PowerPoint presentation, you are familiar with it. There is a good reason it has been the most popular office suite for three decades – it's the best. The following information will be helpful at home and work. No resume is complete without Microsoft Office.
Read on for tips that can benefit every user.
Word: Not Just for Writing Simple Documents
Word is a simple tool for editing school or work documents, maybe the occasional list or letter. It is often used for basic things, but here are a few tips that can make your work easier.
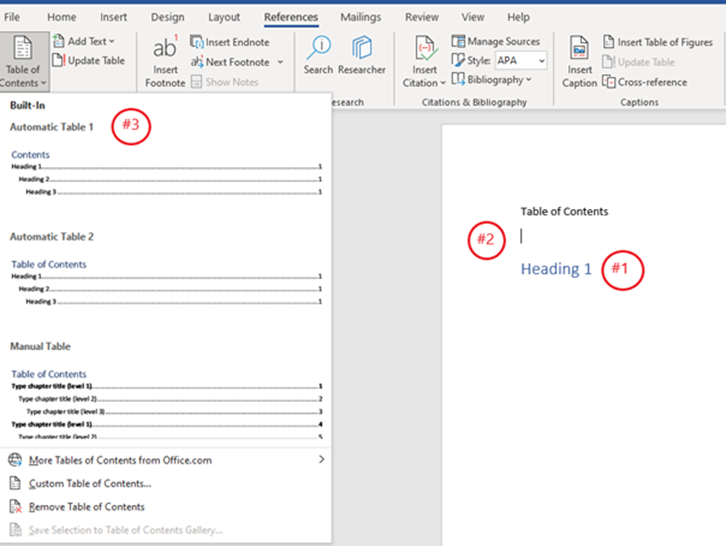
Adding an Official Table of Contents
When you have a Table of Contents, it keeps your work organized so you can easily navigate to any section. Steps are labeled in the screenshot below.
- As you work, the Table of Contents will update for you:
- Before making a Table of Contents, make sure you have at least one heading
- Home -> Styles -> Heading 1, then type your heading
- Label it as a basic heading that will be in your doc, for example: “Heading 1”
- Navigate to where you want your Table of Contents
- Go to References -> Table of Contents
- Choose one of the automatic styles that fits your work
- As you work: add more headings and they will be added to the Table of Contents
- If you are missing info in the TOC, click on it and select Update Table
Quick Note: There are different heading styles (such as “Heading 2” and “Heading 3”) that will create subheadings as you work.
- Heading 2 will be a subheading for Heading 1
- Heading 3 will be a subheading for Heading 2
Saving Custom Formatting/Templates
Templates lessen your workload if you use a similar document frequently, like meeting notes or company presentations.
- You want a template to be a simple outline/starting point, before you add specifics:
- Once your outline document is ready, click File -> Save As
- Click This PC
- Type a simple name for your template
- In the dropdown for document type, switch from the default Word Document (*.docx) to Word Template (*.dotx)
- Click Save
- Your template will save in This PC -> Documents -> Custom Office Templates
- Do not switch the location, otherwise it will not be recognized in Word
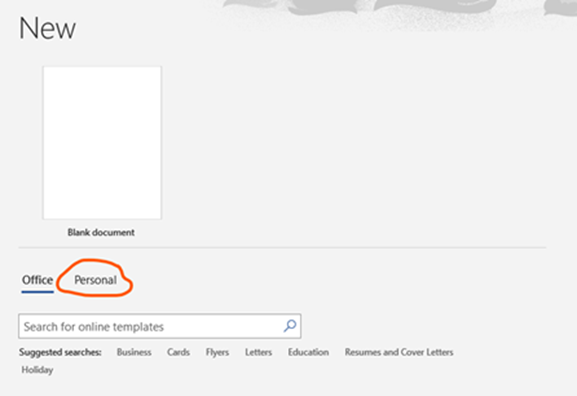
- To use your template and start a more detailed document:
- Click File->New
- Toggle from Office Templates to Personal
- Select your own template to use
Excel: The One You No Longer Have to Be Afraid Of
Excel is the most complicated Microsoft Office program. It can be used for a variety of projects, from math to storing user info, and its abilities seem never ending. A whole post could be written on Excel alone. These are a few simple tips to start with.
Intro (To Just a Few) Formulas and Functions
If you already use Excel, you probably know how to write a formula using the equal sign and simple math. Functions can simplify this work even further.
- Instead of using the + sign many times, use SUM:
- Choose the range of cells or numbers that you want to add
- In your result cell:
- Enter =SUM(First Cell : Last Cell)
- Example:
- =SUM(A1:J1)
- Will sum up the first 10 values in the first row
- Press Enter and the cell will calculate your results
- To average a range of values, use AVERAGE:
- Choose the range of values to average
- In your result cell:
- Enter =AVERAGE(First Cell : Last Cell)
- Example:
- =AVERAGE(C1:C5)
- Will average the first 5 values in the third column
- Press Enter and the cell will calculate your results
- To count the number of cells that match a criterion, use COUNTIF:
- Choose your range of values or words to count
- In your result cell
- Enter =COUNTIF(First Cell : Last Cell, Criteria)
- Example:
- =COUNTIF(B4 : B10, “User Profile”)
- Will tell you how many entries in the second column are labeled “User Profile”
- Example:
- =COUNTIF(C2:C10, 4)
- Will tell you how many entries in the third column equal 4
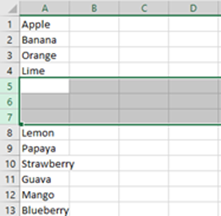
Inserting More Than One Row or Column at a Time
Occasionally, multiple rows or columns need to be added between cells that are already filled. If you need to add 10 rows at once, doing so individually is a lot of work. To save time, you can add in groups of rows or columns at a time.
- To insert a group of rows or columns at once, the trick is highlighting:
- Highlight the same number of rows or columns that you want to insert
- For example: If you want to insert 3 new columns, highlight 3 columns that are already in use
- Right click, then select Insert
Quick Note: Inserting rows or columns isn’t always intuitive.
- When inserting rows, they will appear above the rows you highlighted
- When inserting columns, they will appear to the left of the columns you highlighted
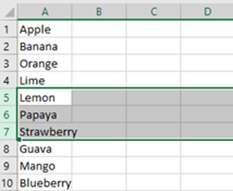
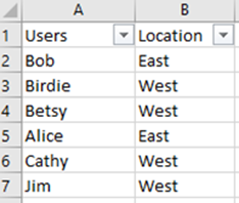
Filtering Your Spreadsheet
You can filter out specific parts of your Excel document. It is very useful when you are working on a large spreadsheet and want to focus on only part of it. Maybe you have a list of employees at different locations, with a column called “Users” and a column called “Location”. Filtering will allow you to see one category (or location) at a time.
- Make sure your columns are labeled before you start:
- Select the title cell of the column you want to filter
- In this case, labeled “Location”
- Go to the Data tab in the navigation ribbon
- Select Filter
- This will show drop down arrows on your column titles
- Click this drop-down arrow to see your options:
- Sort each column A-Z or Z-A
- Category sort
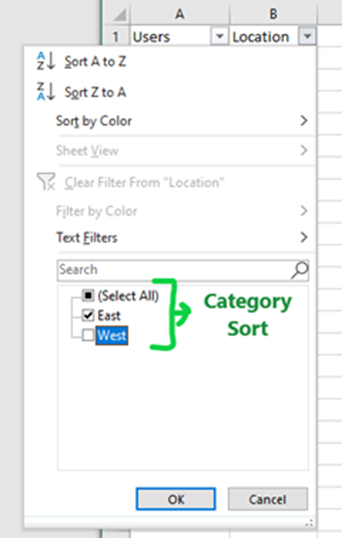
- To sort by category: checkboxes pop up at the bottom
- As you deselect them, these categories won’t show on your spreadsheet anymore
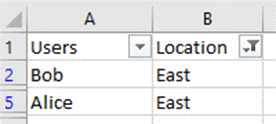
- For example: Deselect the “West” box (like above) to only see users at the East location
Quick Note: You can sort by category and/or alphabetize at the same time!
PowerPoint and OneNote: Less Common but Just as Useful
Everyone has used PowerPoint at least once, maybe occasionally in high school or every week at work. PowerPoint is one of the most straightforward programs, and there aren’t many quick tips to it. That’s why it has been combined with OneNote, which is not as well known, but is very useful.
Using PowerPoint Themes to Make Your Work Cohesive
You might know how to change the background of a slide, but doing it one by one takes extra time and might look messy. Use a theme instead.
- A theme will make your work look cohesive:
- Navigate to the Design tab in the navigation ribbon
- Choose a theme that you like from the options
- Navigate through the design ideas tab on the right to switch up the layout for each slide
Quick Note: Themes have different layouts for many slides, so your presentation will be color coordinated but your slides will have variety.
Taking Quick Notes on OneNote and Storing Them in Notebooks
OneNote is designed to store your “notebooks” on your computer. Those notebooks can then sync through One Drive onto other devices. Use it for lists, to make a quick note during a call, a post-it note, or to create a new notebook.
- To create a note in quick notes:
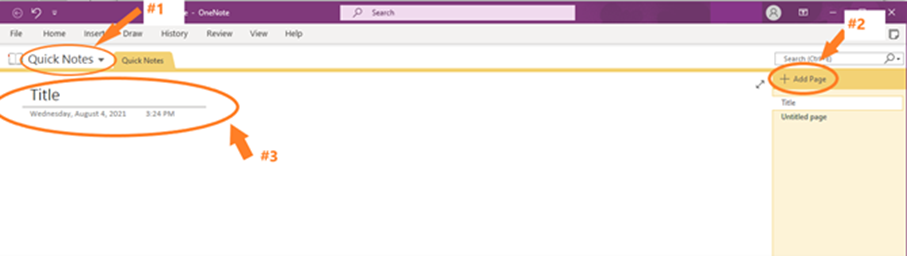
- Open OneNote and you’ll see the title Quick Notes in the top left
- To add a new quick note: click Add Page on the right
- There will be a line at the top with the date under it, which is where you will type the title of your note
- To make a list:
- Go to the Home tab
- Select To-Do in the middle of the ribbon, which will create a checklist for you
- To create a new notebook, maybe for a class or group you attend:
- To create a new notebook, maybe for a class or group you attend:
- In the drop-down menu, which is probably labeled Quick Notes (#1 in the image above), click the arrow to the right
- Click Add Notebook
- Choose the “Browse” icon option on the right

- Type the name of your new notebook, then click Create
- After adding, you will be able to use the drop-down menu to transfer between your notebooks
Put It Into Practice
These are just a few tips to make you more productive with Microsoft Office. Hopefully, you were able to find something helpful.
We covered details about Microsoft Word, like creating a Table of Contents and your own personal template. We discussed a few tricks for Excel: using formulas, inserting multiple rows/columns at a time, and filtering a spreadsheet. We went over how to use a PowerPoint theme, and dove into the basics of OneNote with quick notes and notebooks.
If this information has piqued your curiosity, you can find more information at Microsoft’s Office Help and Training website:
https://support.microsoft.com/en-us/office
If you are looking to move to Microsoft 365 from a local Exchange server, or migrate over to Microsoft 365 from Google Workspace, don't hesitate to reach out to Superior Managed IT's Sales Team for a free consultation! You can reach us through our Contact Us page or by giving us a call at 612-999-6200.
About the author
SMIT Team
Thanks for visiting our blog!
Be sure to check back frequently for the latest industry news and workplace tips.